Built-in Modules
Before diving into how to write a custom HTTPS server in Python, it’s worth mentioning that Python already has built-in modules to run a simple HTTP server.
Python 2
# By default, the server will run on all interface 0.0.0.0 and port 8000
python2 -m SimpleHTTPServer

# It's possible to override the defaults by specifying a custom port
python2 -m SimpleHTTPServer 80
Python 3
# In python 3, by default the server will also run on all interface 0.0.0.0 and port 8000
python3 -m http.server

# In addition to specify a custom port, it's also possible to bind to a specific interface in py3
python3 -m http.server --bind 127.0.0.1 80
Custom POST Method Implementation
However, the default HTTP modules SimpleHTTPServer and http.server are only able to interpret basic GET and HEAD requests. They do not interpret any POST requests nor do they support HTTPS (TLS). We are going to extend the default modules by customizing the POST request handler, then add HTTPS support.
The code will be explained in Python 3 only, since the difference in Python 2 is trivial (different module/class names).
Let’s write a custom HTTP module with the addition of a POST request handler. For demo purpose, this POST request handler will send back the exact payload it gets from the client.
from http.server import HTTPServer, SimpleHTTPRequestHandler
from io import BytesIO

class HTTPRequestHandler(SimpleHTTPRequestHandler):

    # do_GET by default will be inherited from SimpleHTTPRequestHandler which is to list the files/folders in current directory

	def do_POST(self):
        # Retrieves the Content-Length header from the incoming HTTP request, which specifies the length of the request body
        # By default the payload size is in bytes, we need to convert it to int in order to read the correct amount of data
		content_length = int(self.headers['Content-Length'])

        # Read the body of the request
		body = self.rfile.read(content_length)

        # Send an HTTP status code 200 back to the client
		self.send_response(200)

        # This method call signifies the end of the HTTP headers section in the response
		self.end_headers()

        # Prepare the response body
		response = BytesIO()
		response.write(b'This is a POST request. ')
		response.write(b'Received: ')
		response.write(body)

        # Send the response body to the client
        # getvalue() retrieves all data written to the BytesIO stream
		self.wfile.write(response.getvalue())

# Bind the HTTP server to all interfaces and listen on port 8080
httpd = HTTPServer(('', 8080), HTTPRequestHandler)
httpd.serve_forever()
Let’s test our script.

As we browse the server from the local address, we can see that the default GET request handler is still working properly by showing the directory listing.

Now let’s test our POST request handler.


Voila, we get the data (data2=test2&data1=test1) back from which we sent through a POST request!
HTTPS Implementation
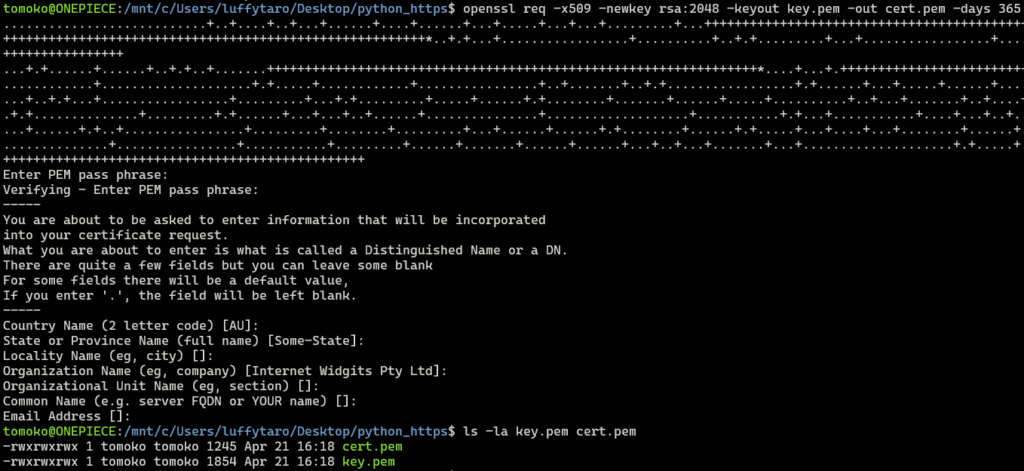
Good, time to move on to HTTPS implementation. We first need to generate a key pair for TLS certificate which is made of a public key and a private key. We are going to generate a RSA certificate with OpenSSL (could be any other tools you like).
openssl req -x509 -newkey rsa:2048 -keyout key.pem -out cert.pem -days 365
req -x509 Specifies that we want to generate self-signed X.509 certificate.
-newkey rsa:2048 Create our cert using RSA algorithm with a key size of 2048 bits, which offers a good balance between security and performance.
-keyout key.pem This is our private key.
-out cert.pem This is our certificate (public key).
-days 365 The certificate will expire after 365 days from the date of creation.
After running the command, it might prompt to create a passphrase for the private key. For the rest of the questions, we can just press Enter to skip them.

Depending on the tool, the private key will usually be created with the permission of 600 (accessible only by the owner). As we are using WSL, the key permission is always 777 by default (accessible by everyone). In Windows it’s possible to modify the permission by going to the “Advanced Security Settings” of the file and set the relevant permissions. As it’s only for testing, it doesn’t really matter.
Now that we have generated our key pair. Let’s create a script for simple HTTPS server in Python using the ssl module (credit to Keijack).
Note: According to the python documentation, ssl.wrap_socket() is deprecated since 3.6, SSLContext.wrap_socket() should be used to wrap a socket instead.
from http.server import HTTPServer, SimpleHTTPRequestHandler
import ssl

# Listen on all interfaces and port 443
httpd = HTTPServer(('', 443), SimpleHTTPRequestHandler)

# PROTOCOL_TLS_SERVER auto-negotiates the highest protocol version that both the client and server support
sslctx = ssl.SSLContext(ssl.PROTOCOL_TLS_SERVER)

# If set to True, only the hostname that matches the certificate will be accepted
sslctx.check_hostname = False

# Load the private key and the corresponding certificate (public key)
sslctx.load_cert_chain(certfile="cert.pem", keyfile="key.pem")

# Setup the SSL socket
# server_side indicates whether server-side or client-side behavior is desired from this socket
httpd.socket = sslctx.wrap_socket(httpd.socket, server_side=True)
httpd.serve_forever()
It will prompt for the previously created passphrase when starting the server.

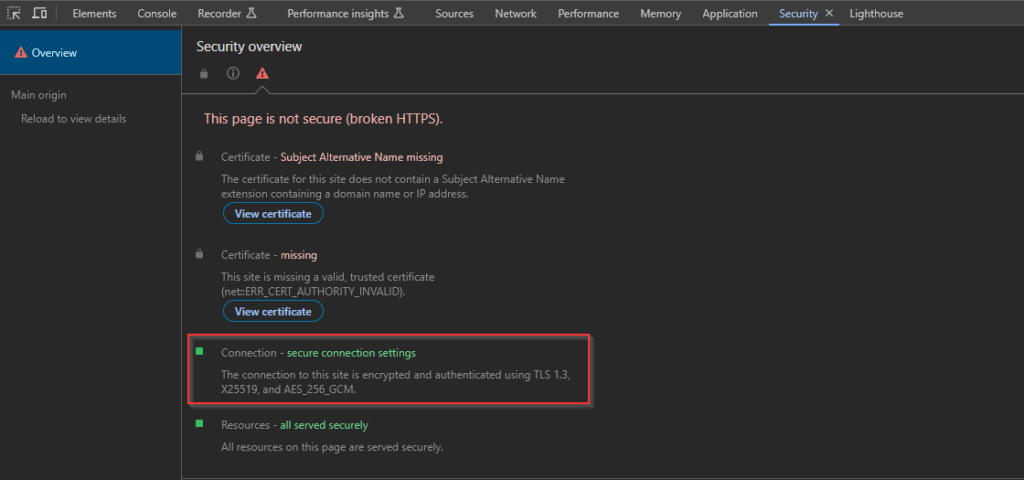
Of course it will show as “Not secure” because it’s a self-signed certificate.

But if we check the security overview from the browser’s “Developer tools”, we can see that it’s indeed using TLS to encrypt the communication.

POST + HTTPS
Finally, let’s combine our custom POST request handler with our HTTPS server.
from http.server import HTTPServer, SimpleHTTPRequestHandler
import ssl
from io import BytesIO

class HTTPRequestHandler(SimpleHTTPRequestHandler):
    def do_POST(self):
        content_length = int(self.headers['Content-Length'])
        body = self.rfile.read(content_length)
        self.send_response(200)
        self.end_headers()
        response = BytesIO()
        response.write(b'This is POST request. ')
        response.write(b'Received: ')
        response.write(body)
        self.wfile.write(response.getvalue())

httpd = HTTPServer(('', 443), HTTPRequestHandler)

sslctx = ssl.SSLContext(ssl.PROTOCOL_TLS_SERVER)
sslctx.check_hostname = False
sslctx.load_cert_chain(certfile="cert.pem", keyfile="key.pem")
httpd.socket = sslctx.wrap_socket(httpd.socket, server_side=True)
httpd.serve_forever()
Twisted
There is another approach to quickly spawn an HTTPS server in Python which is to leverage the Twisted framework. It’s essentially a networking framework that supports various networking protocols.
We can install it using pip ([tls] means to install Twisted with the TLS dependencies).
pip install twisted[tls]
Then we can spawn an HTTPS server with the following command.
twistd -no web --path=. --https=443 -c cert.pem -k key.pem
Twisted produces relatively verbose messages on the console and has a more refined directory listing interface.
(twisted_venv) C:\Users\luffytaro\Desktop\python_https>twistd -no web --path=. --https=443 -c cert.pem -k key.pem
Enter PEM pass phrase:

2024-04-21T22:17:20-0400 [twisted.application.app.AppLogger#info] twistd 24.3.0 (C:\Users\luffytaro\Desktop\python_https\twisted_venv\Scripts\python.exe 3.10.1) starting up.
2024-04-21T22:17:20-0400 [twisted.application.app.AppLogger#info] reactor class: twisted.internet.selectreactor.SelectReactor.
2024-04-21T22:17:20-0400 [-] Site (TLS) starting on 443
2024-04-21T22:17:20-0400 [twisted.web.server.Site#info] Starting factory <twisted.web.server.Site object at 0x0000021A0A6895A0>
2024-04-21T22:17:33-0400 [twisted.python.log#info] "127.0.0.1" - - [22/Apr/2024:02:17:33 +0000] "GET / HTTP/1.1" 200 1588 "-" "Mozilla/5.0 (Windows NT 10.0; Win64; x64) AppleWebKit/537.36 (KHTML, like Gecko) Chrome/124.0.0.0 Safari/537.36"
2024-04-21T22:18:33-0400 [twisted.web.http.HTTPChannel#info] Timing out client: IPv4Address(type='TCP', host='127.0.0.1', port=56247)
